Offer your constituents the opportunity to make additional donations during registration or from the event page.
Quick start — enable the donation button during registration
- Open the event in admin and navigate to the Gifts section in event settings.
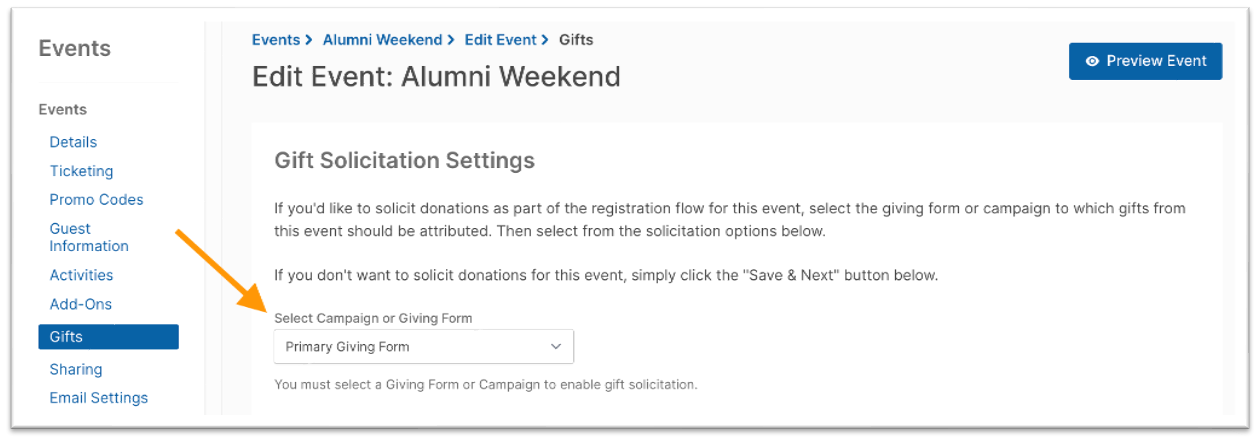
- Select a Social Fundraising campaign or Giving Form for the event. This association is required for both gift solicitation options.
- To display a donation ask within the registration checkout, check Gift Solicitation in Registration Flow, configure the designation and donation text options, and then click Save & Next.
- To display a donation button on the event landing page and registration overview page, check Additional Gifts, set the Donation Text Header and Button Text, and then click Save & Next. The button directs constituents to the associated campaign or giving form.
Quick notes:
- The Donation Text Header in the registration flow (max 100 characters) appears above the donation ask, and the Include suggested giving amounts option adds up to three suggested amounts.
- For Additional Gifts, the Button Text (max 25 characters) appears on the button, while the Donation Text Header (max 60 characters) appears above it on the overview page.
- To disable gift solicitation, open the Gifts section and click Save & Next without selecting a campaign or giving form.
How it works:

Keep in mind:
- Event registrants who make a gift within the registration flow will see their event costs broken out separately from their donation but will only need to complete their payment information once.
- For gifts made during the registration flow, event revenue and donations will be processed as two separate transactions and event registrants who choose to make a gift during the registration process will receive a separate donation receipt in addition to the event confirmation email.
- If desired, administrators can configure a separate Stripe or PayPal account for event revenue; outright donations will always be deposited into the primary Stripe / PayPal account for online giving.
How to enable gift solicitation:
- Gift solicitation can be enabled on an event-by-event basis via the Gifts section of your event settings.
- To enable gift solicitation, select a campaign or giving form to which the gifts will be attributed.
- If you choose to attribute donations to a Social Fundraising campaign, any gifts coming in from your event to that campaign will be treated like any other gift to that campaign. The donor’s gift will count toward campaign goals, the donor’s name will show up on the donor roll and in leaderboards, and the donation will count toward your GC Social Fundraising subscription.
- If you choose to attribute donations to a Giving Form, the gift will count toward your GC Giving Form subscription. If you have a prepaid payment processing bundle, the donation will count toward that bundle.
-
Gift Solicitation in Registration Flow: Check this box to enable gift solicitation in the registration flow.
- Registrants adding a gift to their event registration costs will only have to enter their payment information once, while two separate transactions occur in the background: one for the event costs, one for the gift.
- In addition to the event confirmation email, registrants who add a gift as part of the registration flow will also receive the active email template for the giving form or social fundraising campaign selected.
-
- Select a single designation for this event: All gifts made during the registration flow will be assigned the same designation selected in this field. Donors cannot view the designation selected, change the designation selected, or add additional designations.
- Allow donors to designate gifts themselves: Donors will see the designations available within this event’s associated social fundraising campaign or giving form and can split their gift as many ways as the associated campaign or giving form allows.
- Do not designate gifts made in the registration flow: Donors will not be shown the option to designate their gift and no designation will be assigned to gifts made during the registration flow.
- Donation text header: This text appears beneath the event purchase summary.
- Include suggested giving amounts: Check this box to display up to three ask amount buttons.
Designations:
Designation settings in an event apply only to the registration checkout flow. When you enable gift solicitation during registration, you can choose whether all donations receive a preset designation, or allow donors to select from available designations. Note that these event-level settings affect only the donation process in the checkout. Additional Gifts, which redirect to the associated campaign or giving form, follow the designation configuration set on that destination.

-
Additional Gifts: Check this box to solicit additional gifts via the event landing page and registration overview pages.
- Define the donation text header and button text in the fields provided.
- The donation text header will only appear above the button on the overview page shown to event registrants after their registration is submitted.
- Constituents who click this button will be brought directly to the giving form or social fundraising campaign associated with this event.

Appeal Code Strategy
While you cannot directly link an appeal code to an event, you can track event donations through:
- Event ID column: Available in donation reporting to track gifts made through event pages
- Unique appeal codes: Create event-specific appeal codes for your giving forms
- Campaign tracking: Use campaign-specific giving forms with unique appeal codes
Best Practices by Event Size
Large Events (100+ attendees, major fundraising component):- Create dedicated giving forms
- Use unique appeal codes
- Customize messaging for the event
- Consider event-specific forms for annual events
- Use existing forms with event-specific appeal codes
- Link to existing relevant giving forms
- Focus on stewardship over solicitation
Common variations of this question
- Event-specific giving forms vs general forms
- Appeal codes for event donations
- Giving form strategy for events
- Tracking event donations
- Best practices for event fundraising forms
Changing the event's associated campaign or giving form after creation
You can update an event’s associated campaign or giving form even after the event is created. Launch your event without a campaign and add one later through the Gifts section in event settings.
How to change the association
- Open the event in the admin and navigate to the Gifts section in event settings.
- In the campaign/giving form dropdown, select the Social Fundraising campaign or Giving Form you want to use for future donations.
- Click “Save & Next” to save your changes.
What happens next
- Existing registrations remain unchanged. Records and registration-specific settings will not be affected.
- Future gift solicitations will immediately use the newly selected campaign or giving form on the event landing and registration overview pages.
Practical examples and tips
- Open registration without a campaign: Launch the event first, then add a campaign or giving form via the Gifts section. New registrants will see the updated solicitation.
- Switch the donation destination: Update the selection in the Gifts section. Only donations made after the change will be attributed to the new campaign or form.
Quick reminders
- Use the Gifts section of your event settings to control campaign and giving form associations.
- Changes apply immediately for new registrations but do not retroactively alter past registrations or processed donations.
FAQ — Limit donors to a single designation when an event uses a giving form
Q: How do I allow donors to designate their gift but limit them to one fund?
A: When you choose Allow donors to designate gifts themselves in an event's Gifts section, the number of funds a donor can select is controlled on the associated giving form, not at the event level. To limit donors to a single fund, update the designation settings on that form:
- Open the giving form linked to the event. For standalone forms or those connected to a campaign, navigate to the Form Settings tab.
- Scroll down to the Designation Settings section.
- Set the designation limit to 1:
- Legacy form UI: In the Designations Per Donation section, select 1 from the dropdown.
- Form Builder UI: In the Maximum Designations Per Donation field, enter 1.
This change means donors will see the designation selector on the giving form but can only choose one fund per donation.
Important tip:
If you edit your school's main giving form, setting the designation limit to 1 will affect all users site‑wide. To limit only event gifts, clone the main form, update the clone’s designation limit to 1, and then associate the cloned form with your event in the Gifts section.
Note on event-level single-designation:
The event setting Select a single designation for this event assigns a preset designation to all event gifts without giving donors a choice. In contrast, setting the form’s Maximum Designations Per Donation to 1 still presents the selection option but restricts it to one fund.
Reporting impact:
If you set Maximum Designations Per Donation above 1 to allow split giving, note that standard reports may miss individual split rows. In that case, use Designation Row Reports or the GiveCampus API to export complete designation details.
FAQ — Why don't my event-level designation settings apply when donors click the Additional Gifts button?
Q: I configured an event-level designation option (such as selecting a single designation) in the event’s Gifts section, yet donors clicking the Additional Gifts button still see all available funds. Is this an error?
A: No. The event-level designation settings apply only to donations made during the registration checkout (the option labeled Gift Solicitation in Registration Flow). The Additional Gifts button is a separate channel that directs donors to the linked Social Fundraising campaign or Giving Form. As a result, donors see the designation configuration set on that campaign or form rather than the event-level setting.
Key points
- There are two gift solicitation options: Gift Solicitation in Registration Flow and Additional Gifts. Each behaves independently.
- Designation settings (including Select a single designation for this event, Allow donors to designate gifts themselves, and Do not designate gifts made in the registration flow) apply only to the registration checkout.
- The Additional Gifts button directs donors to the associated campaign or giving form, displaying all designations configured there.
FAQ — Why don't ticket or registration fees appear in my campaign totals?
Q: We linked an event to a Social Fundraising campaign, but the ticket or registration fees from the event are missing from the campaign's donation totals and donor count. Why?
A: Ticket purchases and registration fees are processed and reported separately from campaign donations. Here are the key points:
-
Ticket transactions—including fair market value breakdowns—are recorded as event revenue and do not roll up into the campaign’s donation totals or donor count.
-
When a registrant adds an optional donation during checkout (via Gift Solicitation in Registration Flow), two transactions occur: one for the event fees and one for the donation. Only the donation transaction is applied to the campaign totals.
-
Ticket revenue and any related fair market value details appear in your event deposit reports and financial exports, not in the campaign donation reports.
-
The Additional Gifts button directs donors to the associated campaign or giving form. Gifts made there are processed as regular online gifts and do credit the campaign’s totals, donor roll, and leaderboards.
-
To include ticket revenue in a campaign’s totals, manually add the amount as an offline gift. Open the campaign in admin and navigate to Online Giving > Campaign Manage Donations > Offline Gifts. Offline gifts update campaign totals and donor counts but are not merged with the event’s deposit reports.
-
To review event-related gifts in a campaign, open the campaign in admin under Online Giving > Campaign Manage Donations and filter by the desired date range. Event-sourced gifts from both checkout and Additional Gifts will be listed alongside other online donations.
Best practices:
-
Use event deposit reports to reconcile ticket revenue with bank deposits, and use campaign donation reports to reconcile campaign totals.
-
For a complete reconciliation, export both the event deposit report (found under Online Giving > Banking And Deposits) and the campaign donation report, then join the data externally by deposit ID.
-
Registrants who add a gift during checkout receive both an event confirmation (showing ticket fees and fair market value) and a separate donation receipt for the gift.
-
If campaign-level reporting must include event revenue, either collect that revenue as an explicit additional gift or add it later as an offline gift.
FAQ — Can I pre-select a designation on the giving form only for event visitors?
Q: I want the Additional Gifts button on my event page to open the school's main giving form with a specific fund pre-selected — but only for donors coming from this event. Can I limit a form’s designation behavior to event visitors?
A: No. The Additional Gifts button directs donors to the linked Social Fundraising campaign or Giving Form, which always uses its own designation settings. These settings apply to every visitor, regardless of where they come from.
What this means and the recommended workflow
- The event’s Gifts section provides two channels: Gift Solicitation in Registration Flow and Additional Gifts. The designation settings in the event (such as Select a single designation for this event, Allow donors to designate gifts themselves, or Do not designate gifts made in the registration flow) affect only the registration flow.
- The Additional Gifts button takes donors directly to a campaign or giving form, displaying the form’s designations as configured without any event-specific adjustments.
- To offer an event-specific designation experience, create and configure a dedicated giving form, then associate that form with your event. This approach isolates the event experience from the school’s main giving form.
Step-by-step (recommended)
-
Configure a dedicated giving form:
- Open the giving form in admin and go to its settings page.
- Adjust the Designation Settings (for example, limit designations per donation or include only the desired fund) and save the changes.
-
Link the dedicated form to your event:
- Open the event in admin and navigate to the Gifts section.
- Select the dedicated giving form, enable Additional Gifts if desired, and set the Donation Text Header and Button Text.
- Click Save & Next to update the event.
Notes
- Changing designation settings on a form affects all its uses. Using a dedicated form prevents impacting visitors who use the school’s main giving form.
- Gifts via Additional Gifts will be reported as standard gifts to that form, so use Designation Row Reports or the GiveCampus API for detailed reports if split designations are enabled.
How to control designations for the Additional Gifts button
FAQ — Why don't gift solicitation or designation options appear when I'm testing my Draft event?
Q: I enabled Gift Solicitation in the event’s Gifts section and set the designation behavior, but when I preview or test a Draft event the donation ask and designation selector do not appear. What am I missing?
A: This behavior is expected. The donation ask and designation selector are part of the registration checkout (payment flow), which is disabled in Draft mode. The checkout is only accessible once the event is published.
What to check:
- The Gifts settings (for example, Select a single designation for this event, Allow donors to designate gifts themselves, or Do not designate gifts made in the registration flow) are configured correctly. They will only display once the event is live.
- Open the event in admin and navigate to the Gifts section to review your settings.
- The Additional Gifts button, which directs donors to the associated Social Fundraising campaign or Giving Form, operates separately and reflects the designation settings on that destination.
How to verify your configuration (safe test workflow):
- Clone the event in admin. This creates a separate event that you can publish without affecting your original draft.
- Publish the cloned event using the Publish Event button so the registration checkout is accessible.
- Complete a test registration on the published clone to confirm the donation ask and designation behavior as donors will experience them.
Quick reminders:
- Gift Solicitation in Registration Flow operates only within the checkout and uses the event-level designation settings, while Additional Gifts redirects to a live campaign or giving form with its own designation configuration.
- To restrict funds for event gifts when donors click Additional Gifts, update the designation settings on the linked Social Fundraising campaign or Giving Form.
- Changes in the Gifts section show immediately on a published event’s checkout but are not visible while the event remains in Draft.
-
Edit the linked campaign or giving form: Open the Social Fundraising campaign or Giving Form connected to the event and update its designation settings. Refer to the existing FAQ in this article for details on setting the form’s Maximum Designations Per Donation.
-
Use an event-specific giving form: If you want the Additional Gifts button to show a tailored designation (for example, a single event fund), create a dedicated giving form with only the desired designations and select that form in the event’s Gifts section.
Practical examples
- To assign a gift automatically to a specific fund during checkout, use Gift Solicitation in Registration Flow with the Select a single designation for this event option.
- To offer an overview-page button that leads to a streamlined, single-designation giving page, create a dedicated event-specific Giving Form and link it via the Additional Gifts button.
Common source of confusion
Because both solicitation channels are managed in the event’s Gifts section, it’s easy to assume a setting applies across the board. In reality, registration checkout settings affect only that channel, while the Additional Gifts button always reflects the designation settings on its destination campaign or form.
Comments
0 comments
Article is closed for comments.