How to Build and Utilize Query Built Segments
Building a Query Built Custom Segment
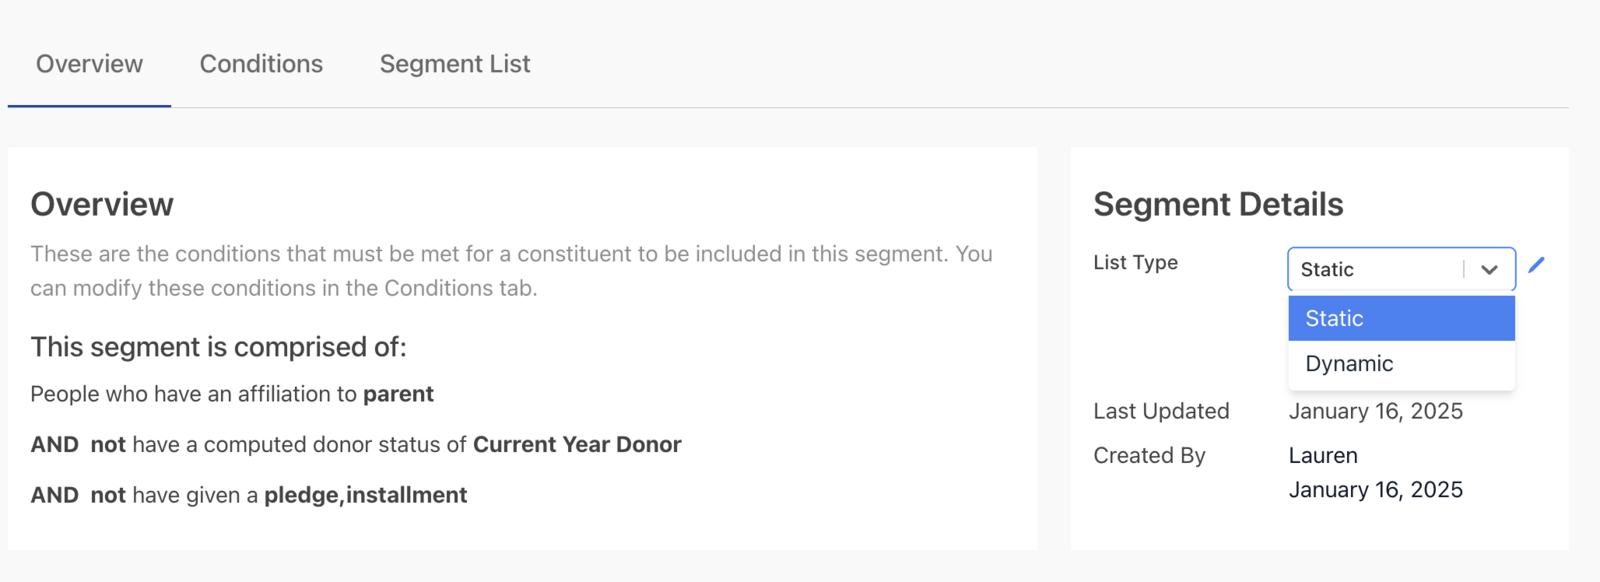
After building your conditions, switch to the Overview tab to review a summary of the segment members. New segments default to dynamic, meaning they update automatically when revisited, when used in an outreach, or just before a scheduled send. To capture a fixed list, change the segment to static; a static segment remains unchanged until you manually refresh it from the segment list view.
you can choose to create a new outreach using the "build new segment" option.Naming your segment will require you to create a uniquely named segment from any other segments you have in your GiveCampus list

Defining Your Conditions
Targeting event participants by specific activities
GC Outreach segments allow you to filter event registrants at the activity level. This enables you to target only those who signed up for a specific activity—like a keynote session, workshop, or reception—instead of emailing or texting everyone registered for the event.
Available filters
- Apply activity-specific filters to include or exclude participants based on their activity choice.
- Use these filters to target a specific session within a multi-track event.
Tips for complex criteria
- Combine activity-level filters with other conditions using inner condition groups for clear, complex logic (for example, parents who registered for a reception and have not donated).
- To exclude one activity while including another, create separate condition groups and combine them using the appropriate any/all logic.
Testing your segment
- Test your segment with a small group or preview the Segment List to ensure it includes the correct participants before launching a full send.
Matching and delivery
- For email outreach, the recipient’s email in the segment must match the email in their GiveCampus account or registration for successful delivery and for any exclusion criteria to apply properly.
- Activity-based filters rely on accurate registration data. If an activity selection was updated outside the platform or through an import that didn’t include activity data, the segment may not reflect the change until the data is updated.
Use cases
- Remind only the participants of a specific workshop about an upcoming session.
- Invite only activity volunteers to a briefing email.
- Exclude VIP reception registrants from a general survey, targeting only standard-session attendees.

Conditions can be a mixture of all conditions or any conditions being met and using an "inner condition" will create a sub option that can be a different.
Data elements to build your segment will start from any information on GiveCampus including people who have donated, people who have registered, and people who have been imported through various options in the GiveCampus platform. The starting point is those listed in the School Dashboard > Constituents page (all tabs)
GC Intelligence Predictive Conditions
You can use GC Intelligence predictive scores as a condition when building a custom segment. To add this condition, open the condition type picker and select the X times more likely than average to perform an action option under the GC Intelligence category. This reveals two fields:
-
Action dropdown – Choose the prediction type:
- Likelihood to be a recurring donor
- Likelihood to make a leadership level gift
- Likelihood to advocate
• Note: The options for recurring donor and advocacy are available if GC Intelligence Smart Segments are enabled for your school. The leadership gift option only appears if your school has generated leadership gift predictions.
-
How many times more than average? – Enter a numeric multiplier to select constituents who are that many times more likely than average to take the chosen action (for example, entering 3 targets those three times more likely than average).
Each Action choice displays a short explanatory note in the condition builder, for example:
- Recurring donor: "The constituents must be the following amount more likely to be a recurring donor than average..."
- Leadership gift: "The constituents must be the following amount more likely to make a leadership level gift than average..."
- Advocacy: "The constituents must be the following amount more likely to advocate than average..."
How this fits into your segment workflow
- Navigate to GC Outreach > Segments > Custom Segments and click Build New Segment.
- Add the GC Intelligence condition within any condition group and combine it with other criteria (such as demographics, gift history, or event attendance) for precise, behavior-driven targeting.
- While the Smart Segments tab also offers these prediction types (with the leadership gift option appearing only when available), using the predictive condition in custom segments lets you integrate predictive logic with other conditions.
Reviewing Your Segment
A static segment will remain as is unless you choose to "refresh" the segment manually on the segment list view
A dynamic segment will update automatically in the background. This could be when you revisit the segment, use it on an outreach, and right before it's used to send to recipients on a specific outreach.
The segment list page will display all people that are in the segment. Email addresses are not required to display in the list but are required to use in an outreach.
Download Segments
Now that your segment has been generated you can download your segment as a CSV! When viewing your Segment, click "Segment List" and click the "Download" button
Troubleshooting Segment Filters
Missing Affiliation Options in Dropdown Menus
Common variations of this question:
- Why don't I see affiliation options in the dropdown?
- The donor affiliation filter is empty
- How do I filter by student or faculty status?
Common causes and solutions:
1. Data not imported: Affiliation data must be imported through the School Level Data Importer first
- Ensure your CSV includes affiliation fields like "student", "faculty", "staff", "alumni"
- Upload constituent data with proper affiliation coding
2. Segment not properly configured:
- Start with campaign donors first, then apply filters
- Ensure you're using the correct segment type (custom vs. campaign-based)
3. Timing issues:
- Allow time for data processing after uploads
- Refresh your browser and try building the segment again
4. Contact support: If affiliation options still don't appear after data upload, contact support with the specific segment link for troubleshooting
Pro tip: Test your segments with a small group first to ensure filters are working correctly before sending to larger audiences.
Frequently Asked Questions:
FAQ — What timeframe does the "Made donation type → Recurring Installment" condition use?
Overview: This condition evaluates a constituent’s complete online giving history. There is no built-in date range or cutoff.
Narrowing by date: If you need to limit results to a specific period, combine the Made donation type condition with a Given a certain amount online condition. For example:
- Add Online Giving → Made donation type → Recurring Installment.
- Add Online Giving → Given a certain amount online, choose The person must have given at least a specific dollar amount, enter a nominal floor (such as $0.01), and specify your start and/or end dates.
- Set the condition group to ALL so both criteria must be met.
Notes:
- The condition matches any recurring installment processed online, regardless of current subscription status.
- Offline gifts are excluded, as these filters apply only to online payments.
Q: When filtering for campaign donors, do offline gifts count?
A: No, offline gifts do not count in filters for online gifts to campaigns and giving forms.
FAQ — Target donors who gave to a specific designation within a date range
Q: How do I build a segment for donors who gave to a specific designation between two dates?
A: Use two Online Giving conditions in the same condition group: one to filter by designation, and one to filter by gift date (and amount).
- Go to GC Outreach > Segments > Custom Segments and click Build New Segment.
- Add the Designation Name condition from the Online Giving category. Choose The person must have given to a specific designation(s) and select your designation(s).
- Add the Given a certain amount online condition from the Online Giving category. Choose The person must have given at least a specific dollar amount, enter a nominal amount (for example, $0.01) to capture any gift, and fill in the dates:
- Specify both start and end dates to target a defined window.
- Specify only a start date to include all gifts from that date forward.
- (You can also use The person must have given no more than a specific dollar amount to set an upper limit if needed.)
- Ensure the condition group is set to ALL so that both conditions must be met.
Key details:
- The Designation Name filter assesses all-time online giving history and does not include date fields, which is why the second condition is required.
- Both conditions apply only to online gifts; offline gifts are not included.
- Use a dynamic segment to have the group update automatically as new qualifying gifts are made; dynamic segments update at send time.
FAQ — How do I target one‑time donors vs. recurring installment payments?
Q: I need a segment that contains only donors who have made recurring installment payments (or only one‑time donors). Which condition should I use and how do I build it?
A: Use the Made donation type condition in the Online Giving category. Follow these steps:
-
Start the segment
- Navigate to GC Outreach > Segments > Custom Segments tab and click Build New Segment. Name your segment and click Create Segment to open the condition builder.
-
Add the Made donation type condition
- In the condition type selector, open the Online Giving category and select Made donation type.
- Choose between The person must have made this type of gift (include) or The person must not have made this type of gift (exclude).
-
Select the donation type
- Available options include: One Time, Match, Recurring Installment, Challenge, Pledge, and None but gave data (should-be donor).
- To target recurring donors, select The person must have made this type of gift and check Recurring Installment.
-
Consider key behaviors
- This condition matches donors who have ever made a recurring installment payment based on historical online payment activity. It does not reflect whether a subscription is active or differentiate payment methods (e.g., PayPal vs. card).
- Offline gifts are not included; the filter applies only to online gifts.
-
Narrow or combine with other conditions
- To target recurring donors for a specific campaign or giving form, add a Given to Campaign/Giving Form condition in the same group and set the group logic to ALL.
-
Make the segment dynamic
- Set the segment to dynamic so it updates automatically at send time, ensuring new recurring installments are included.
Example: To target recurring donors for a specific campaign, build a Custom Segment, add Made donation type (select Recurring Installment), and then add Given to Campaign/Giving Form to select the relevant campaign. Ensure the condition group is set to ALL and enable dynamic updates.
Summary: Use Online Giving → Made donation type → select Recurring Installment to include recurring installment donors. Combine this with campaign or giving form filters to refine your audience. Remember, the condition reflects historical online payment activity and excludes offline gifts.
FAQ — The "New Segment" modal opens but the content is blank
Q: When I click New Segment, the modal shows only a title with no form content. What’s happening and how do I fix it?
A: This is a browser rendering issue rather than a permissions error or outage. To resolve it:
- Sign out of GiveCampus using the Sign out option in your account menu.
- Clear your browser’s cache and cookies for givecampus.com to force a refresh of the latest files.
- Sign back in, navigate to GC Outreach > Segments > Custom Segments, and click New Segment. Then, select Build a new Segment in the modal.
- If the modal remains blank, try opening a private or incognito browser window and sign in there. If it works in the private window, the issue may be due to browser cache or extensions; disable extensions or clear cache again.
Note: A blank modal can occur even when your permissions are correctly configured. This is a local browser issue and is typically resolved by these steps.
Working with Custom Fields in Segments
How Custom Fields Appear in GC Outreach
When you import custom fields through the School Level Data Importer, these fields are available for segmentation in GC Outreach but may not be visible in individual constituent records.
Where to Find Custom Field Data
Custom fields imported via the Data Importer can be found in:
- GC Outreach segments: Use custom fields as filtering conditions
- GC Gift Officer: Custom fields are visible in donor management tools
- Segment results: When you build segments using custom fields, the data will populate correctly
Verifying Custom Field Imports
To confirm your custom fields imported successfully:
1. Go to GC Outreach > Segments
2. Create a new segment using your custom field as a condition
3. If the segment populates with results, your custom field data imported correctly
4. The field data is working even if not visible in individual records
Example: Sports Interest Fields
If you imported a "Cheerleading" interest field:
- Create a segment with condition: "Custom Field: Cheerleading = Yes"
- The segment will show all constituents with that interest
- This confirms the data imported successfully
Troubleshooting Custom Field Issues
If custom fields aren't working in segments:
- Check your import file column headers match exactly
- Verify the import completed without errors
- Ensure you're using the correct field name in segment conditions
- Contact support if segments aren't populating as expected
Common variations of this question
- Where do custom fields show up after import?
- Can't see imported custom data in constituent records
- How to verify custom field imports worked
- Using imported custom fields in segments
Excluding Campaign Donors with Dynamic Segments
How to Email Only Non-Donors During Active Campaigns
For campaigns like Giving Day, you can automatically exclude people who have already donated so you only contact those who haven't given yet.
Step 1: Start with your full constituent base
- Go to GC Outreach > Segments > Custom Segments
- Click "Build New Segment"
- Start with a condition that includes all your target constituents
Step 2: Add exclusion filter for campaign donors
- Add a new condition group
- Select "Given to Campaign/Giving Form" from the Online Giving category
- Choose "The person must not have given to a specific campaign / giving form"
- Select your campaign from the dropdown
Step 3: Make the segment dynamic
- In segment settings, set List Type to "Dynamic"
- This ensures the segment automatically updates as new people donate
- When you send emails, recent donors will be automatically excluded
Step 4: Use for ongoing communications
- Schedule multiple outreach emails using this same segment
- Each send will automatically exclude new donors who gave since the last email
Additional Considerations for dynamic segments
-
Automatic refresh at send time: Dynamic segments refresh in real time when an email is sent, so any online donation made just before sending will automatically trigger exclusion from the outreach list.
-
Online gifts vs. offline donations: Exclusion filters apply only to online donations. Offline contributions are not considered, meaning constituents with offline gifts will still appear in the segment.
-
Data matching requirements:
- For email outreach, the donor’s email in the gift record must exactly match the email in the outreach list for exclusion to occur.
- For text outreach, exclusion depends on matching phone numbers between the gift record and the recipient list.
Following these guidelines helps ensure your dynamic segments work as expected without manual refreshes.
Excluding Campaign Donors with Dynamic Segments: Best Practices
Dynamic segments automatically refresh to exclude online donors, making them ideal for ongoing fundraising communications.
How dynamic segments exclude donors
- The segment refreshes automatically, including right before sending.
- New donations prompt immediate removal from the segment.
- This approach works well for multi-day campaigns and recurring outreach.
Matching rules and scope
Contact matching:
- For email outreach, exclusion applies only when the donor’s gift email matches the recipient’s email.
- For text outreach, exclusion applies when the donor’s gift phone matches the recipient’s phone number.
Exclusion criteria:
- Only online gifts are considered for exclusion.
- Constituents with only offline donations remain in the segment.
Best practices for campaign communications
- Use dynamic segments for rolling campaigns or recurring communications.
- Test your segment with a small group to confirm the exclusion logic.
- Monitor segment size to verify that exclusions are occurring as expected.
- Preview recipient lists and spot-check recent donor records before major sends.
Building an effective exclusion segment
- Start with your full constituent base – include all target recipients.
- Add an exclusion filter – apply the condition "The person must not have given to a specific campaign/giving form."
- Set the segment type to dynamic – this enables automatic updates as new donations are received.
- Reuse the segment for ongoing communications such as nurture series or multi-day campaigns.
-
- Perfect for multi-day campaigns or ongoing appeals
Dynamic vs. Static Segments for Donor Exclusion
Dynamic segments: Automatically update to exclude new donors (recommended for active campaigns)
Static segments: Capture donors at a point in time (manual refresh needed)
Best Practices
- Test your segment first with a small group
- Verify the exclusion logic is working correctly
- Use dynamic segments for active campaigns
- Monitor segment size to ensure expected exclusions
Dynamic segments and scheduled sends: what updates when
- Dynamic segments refresh at send time, not when outreach is scheduled. For example, if you schedule an email for tomorrow at noon, the segment re‑evaluates right before sending.
- Any gifts made between scheduling and sending are reflected in the exclusions. All dynamic segment conditions, not just donor exclusions, update with the most current data.
- Because processing occurs at send time, the recipient count may differ from the originally scheduled count.
Gift matching and exclusions
- Exclusion behavior is determined by matching email addresses. Joint gifts may be treated differently than individual gifts if the gift record’s email does not match the outreach list.
- Donor exclusions rely on matching the email address in the gift record with the email address of the segment member.
Create a segment by CSV upload (alternative to query‑building)
You can create a segment by uploading a CSV file on the Custom Segments tab. This option is useful if you already have a prepared list or want a reusable segment from an external source.
How it works
- In GC Outreach > Segments > Custom Segments, the segment creation modal offers two options: Build (query‑built) and Upload (CSV‑based). Note that the Build option is available only for select plan tiers; Upload is always available.
- The segment is automatically named based on the CSV filename.
CSV file requirements and common validation errors
- The CSV file must include these column headers:
external_idfirst_namelast_nameemail_addressphone_number
- You may omit either email_address or phone_number, but not both. Omitting any of the other three headers will cause the upload to fail.
- Additional columns starting with custom_ are accepted as custom merge tokens if they only contain letters, numbers, and underscores after the prefix. Otherwise, an error is triggered with the message: "your CSV contains an improperly named custom merge token. Please check the naming and try again."
- Extra columns that don’t start with custom_ are ignored.
- There is a limit of 50 custom merge token columns. Exceeding this number results in an error: "your CSV contains more than 50 custom merge tokens. Please remove some and try again."
- If the headers do not match the required set, the upload fails with an error such as:
- "your CSV columns do not match the required columns for this upload. Please check the naming and ensure they are all present and try again."
- "Looks like your CSV's columns do not match the column requirements. Please check the naming and ensure they are all present and try again."
CSV segments vs. outreach recipient uploads
- CSV-uploaded segments create a reusable, named segment in GC Outreach > Segments that can be used for future outreaches or downloaded.
- Using the Add Recipients button in a draft outreach attaches contacts only to that specific send and does not create a reusable segment.
Using custom merge tokens
- Custom columns that follow the naming convention (starting with custom_ and using only letters, numbers, and underscores) become available as merge tokens in the email builder, allowing for personalized outreach.
Troubleshooting checklist
- Confirm you created the segment via the Custom Segments tab and selected Upload in the modal.
- Open your CSV in a text editor to ensure the headers match exactly:
external_id,first_name,last_name,email_address,phone_number. Custom columns must start with custom_ and follow the naming rules. - Verify that you have no more than 50 custom merge token columns.
- If omitting a contact method, ensure only one (either email_address or phone_number) is removed.
- If the upload fails, review the error message, correct the CSV headers or column count, and try again.
Quick examples
Valid minimal CSV headers:
external_id,first_name,last_name,email_address,phone_number
Valid CSV with a custom token:
external_id,first_name,last_name,email_address,phone_number,custom_campaign_cause
Where to go next
After a successful upload, the segment appears in your Custom Segments list. From there, you can preview, download, or use it as the recipient source when composing an outreach. For one‑off recipient lists, use the outreach Add Recipients workflow instead.
FAQ — Why is the Affiliation dropdown empty when building a segment, and what should I do?
Issue: The Affiliation condition pulls data from constituent records. If no options appear, it typically means that affiliation data has not yet been imported or loaded.
Using affiliation in a segment:
- Go to GC Outreach > Segments > Custom Segments and click Build New Segment.
- In the condition builder, add the Affiliation condition from the Constituent Data category.
- Select the affiliation name from the dropdown (e.g., "Parent" or "Alumni") and pick the desired affiliation value(s).
- Combine this filter with others (such as Given to Campaign/Giving Form) in a condition group set to ALL.
If the dropdown remains empty:
- Verify that your constituent data import included an affiliation column and completed successfully.
- Affiliation values must be imported via the School Level Data Importer to appear in the condition builder.
- Once imported correctly, the values will appear automatically.
Comments
0 comments
Article is closed for comments.